This document includes necessary information for integrating Countly iOS SDK in your Xamarin.Forms project.
Minimum iOS version
Countly iOS SDK needs a minimum of iOS 8.0 ( macOS 10.9) to work.
Integration
To integrate CountlySdk into your application, please follow these steps:
- Start Xamarin Studio.
- From the File menu, select New > Solution
- Add a new Xamarin.iOS project called CountryTestDemo to the solution,
- Install Countly Analytics for Xamarin (iOS) package from Nuget using command Install-Package CountlySDK.Xamarin.iOS into your project.
- In your Appdelegate, add
using CountlySdkand inside FinishedLaunching add following lines at the beginning
using CountlySdk;

namespace CountlyTestDemo.iOS
{
    [Register("AppDelegate")]
    public partial class AppDelegate : global::Xamarin.Forms.Platform.iOS.
                             FormsApplicationDelegate
    {
        public override bool FinishedLaunching(UIApplication app,
        NSDictionaryoptions)
        {
            global::Xamarin.Forms.Forms.Init();
            CountlyConfig config = new CountlyConfig();
            config.AppKey = "your_App_Key";
            config.Host = "https://YOUR_COUNTLY_SERVER";
            Countly.SharedInstance().StartWithConfig(config);
            LoadApplication(new App());
            return base.FinishedLaunching(app, options);
        }
    }
}- You need to set your app key and host on CountlyConfig object. Make sure you use App Key (found under Management > Applications) .
If you are using Countly Enterprise trial servers host should be https://try.count.ly, https://us-try.count.ly or https://asia-try.count.ly. Basically the domain you are accessing your trial dashboard from.
- You can run your project and see first session data immediately on your Dashboard.
Advanced Configuration
Debug Mode
If you want to enable debug mode of Countly iOS SDK which output internal infos, errors and warnings into console, you can set enableDebug flag on CountlyConfig object before starting Countly.
config.EnableDebug = true;Additional Features
If you want to use additional features like PushNotifications, CrashReporting and AutoViewTracking you can specify them in features array on CountlyConfig object before you start:
 public partial class AppDelegate : global::Xamarin.Forms.Platform.iOS.
                             FormsApplicationDelegate
    {
        public override bool FinishedLaunching(UIApplication app,
        NSDictionaryoptions)
        {
            global::Xamarin.Forms.Forms.Init();
            CountlyConfig config = new CountlyConfig();
            config.AppKey = "your_App_Key";
            config.Host = "https://YOUR_COUNTLY_SERVER";
            config.Features = new NSObject[] { Constants.CLYPushNotifications,                  Constants.CLYCrashReporting, Constants.CLYAutoViewTracking };
            Countly.SharedInstance().StartWithConfig(config);
            LoadApplication(new App());
            return base.FinishedLaunching(app, options);
        }
    }
}
Device ID
- Custom Device ID
If you want to use custom device ID, you can set deviceID property on CountlyConfig object.
config.DeviceID = "customDeviceID";Note: Once set, device ID will be stored persistently in device on the first launch, and will not change even after app delete and re-install, unless you change it explicitly.
- Changing Device ID
You can use SetNewDeviceID method to change device id on runtime after you start Countly. If onServer bool is set to true, old device ID on server will be replaced with the new one, and data associated with old device ID will be merged automatically.
Countly.SharedInstance().SetNewDeviceID("new_device_id",true); Otherwise, if onServer bool is not set, device will be counted as a new device on server.
Countly.SharedInstance().SetNewDeviceID("new_device_id",false); - Handling User Login and Logout
If your app allows users to login, then logged in users can be tracked with custom user ID. For this , you can use UserLoggedIn() and UserLoggedOut() methods for changing device ID.
UserLoggedIn() method handles switching from device ID to custom user ID for logged in users.
Countly.SharedInstance().UserLoggedIn("UserID");UserLoggedOut() method handles switching from custom user ID to device ID for logged out users. It is a method that handles resetting device ID to default one and starting a new session.
Countly.SharedInstance().UserLoggedOut();Other Settings
On CountlyConfig object you can specify further optional settings such as:
- Update Session Period
You can specify UpdateSessionPeriod on CountlyConfig object before starting Countly. It is used for session updating and sending events to server periodically. It’s default falue is 60 seconds for iOS.
config.UpdateSessionPeriod = 80;- Manual Session Handling
you can set ManualSessionHandling flag on CountlyConfig object to handle sessions manually.
config.ManualSessionHandling = true;Countly SDK for Xamarin tracks sessions automatically and sends begin_session request on initialization, periodical update session request on specified interval (60 sec by default), end_session request when app goes to background, and begin_session request again when app comes back to foreground.
If ManualSessionHandling flag is set, Countly iOS SDK does not send these requests automatically. So, you need to call beginSession, updateSession and endSession methods manually after you start Countly, depending on your own definition of a session.
Countly.SharedInstance().BeginSession();
Countly.SharedInstance().UpdateSession();
Countly.SharedInstance().EndSession();- Event Send Threshold
EventSendThreshold is used to send events requests to server when number of recorded events reach it without waiting for next update session request.
config.EventSendThreshold = 5;- Stored Requests Limit
StoredRequestsLimit is used to limit number of request to be queued. In case your Countly server is down, queued request may reach excessive numbers, and it may cause problems with being delivered to server and stored on the device. To prevent this, Countly SDK will only store requests up to limit value. By default this is 1000.
config.StoredRequestsLimit = 5000;- Always use POST method
You can set AlwaysUsePOST flag on CountlyConfig object before starting Countly. It is used for sending all requests using HTTP POST method regardless of the data size. If set, all requests will be sent using HTTP POST method. Otherwise; only the requests with a file upload or data size more than 2048 bytes will be sent using HTTP POST method.
config.AlwaysUsePOST = true;- Additional Info
You can set additional Country, City and Location (coordinates) information to be sent with each session, using ISOCountryCode, City and Location properties on CountlyConfig object.
ISOCountryCode should be an NSString. City should be an NSString specifying city name. Location should be a CLLocationCoordinate2D struct specifying latitude and longitude.
config.ISOCountryCode = "IN";
config.City = "Noida";
config.Location = new CLLocationCoordinate2D(28.5986, 77.3339);- Custom Header Field
You can set optional customHeaderFieldName to be sent with every request. It is useful if your server requires special headers to be sent for security reasons. Every request sent to Countly server will have this custom HTTP header and its value will be what is specified in customHeaderFieldValue property.
config.CustomHeaderFieldName = "X-My-Custom-Field";
config.CustomHeaderFieldValue = "my_custom_value";- Star Rating
You can set Countly iOS SDK to automatically ask users for a 1-to-5 star-rating for each version depending on App launch.For this, you need to set StarRatingSessionCount property on CountlyConfig object. When total number of sessions reaches starRatingSessionCount, an alert view asking for 1-to-5 star-rating will be displayed automatically, once for each new version of the app.

config.StarRatingSessionCount = 5;If you want star-rating dialog to be displayed only once for app lifetime, you can set starRatingDisableAskingForEachAppVersion flag on CountlyConfig object.
config.StarRatingDisableAskingForEachAppVersion = true;Additionally, you can customize star-rating dialog message using StarRatingMessage property on CountlyConfig object.
config.StarRatingMessage = "Would you rate the app?";Additionally, you can use AskForStarRating method to ask for a star-rating anytime you want.
Countly.SharedInstance().AskForStarRating((obj) => Console.Write("Rating"));Notes
iTunesConnect IDFA Warning
As Countly iOS SDK source has references to IDFA and iTunesConnect checks for API usage, even if you are not explicitly using IDFA as device ID, you may need to answer Yes for "Does this app use the Advertising Identifier (IDFA)?" question on iTunesConnect app submit form. Please make sure you follow the instructions specified in iTunes Connect Developer Guide - The Advertising Identifier (IDFA) section. Otherwise your app may get rejected due to "Improper use of IDFA" or fail to proceed on app submitting. In screenshot below, you can see which checkboxes to select while sending your app to the App Store :
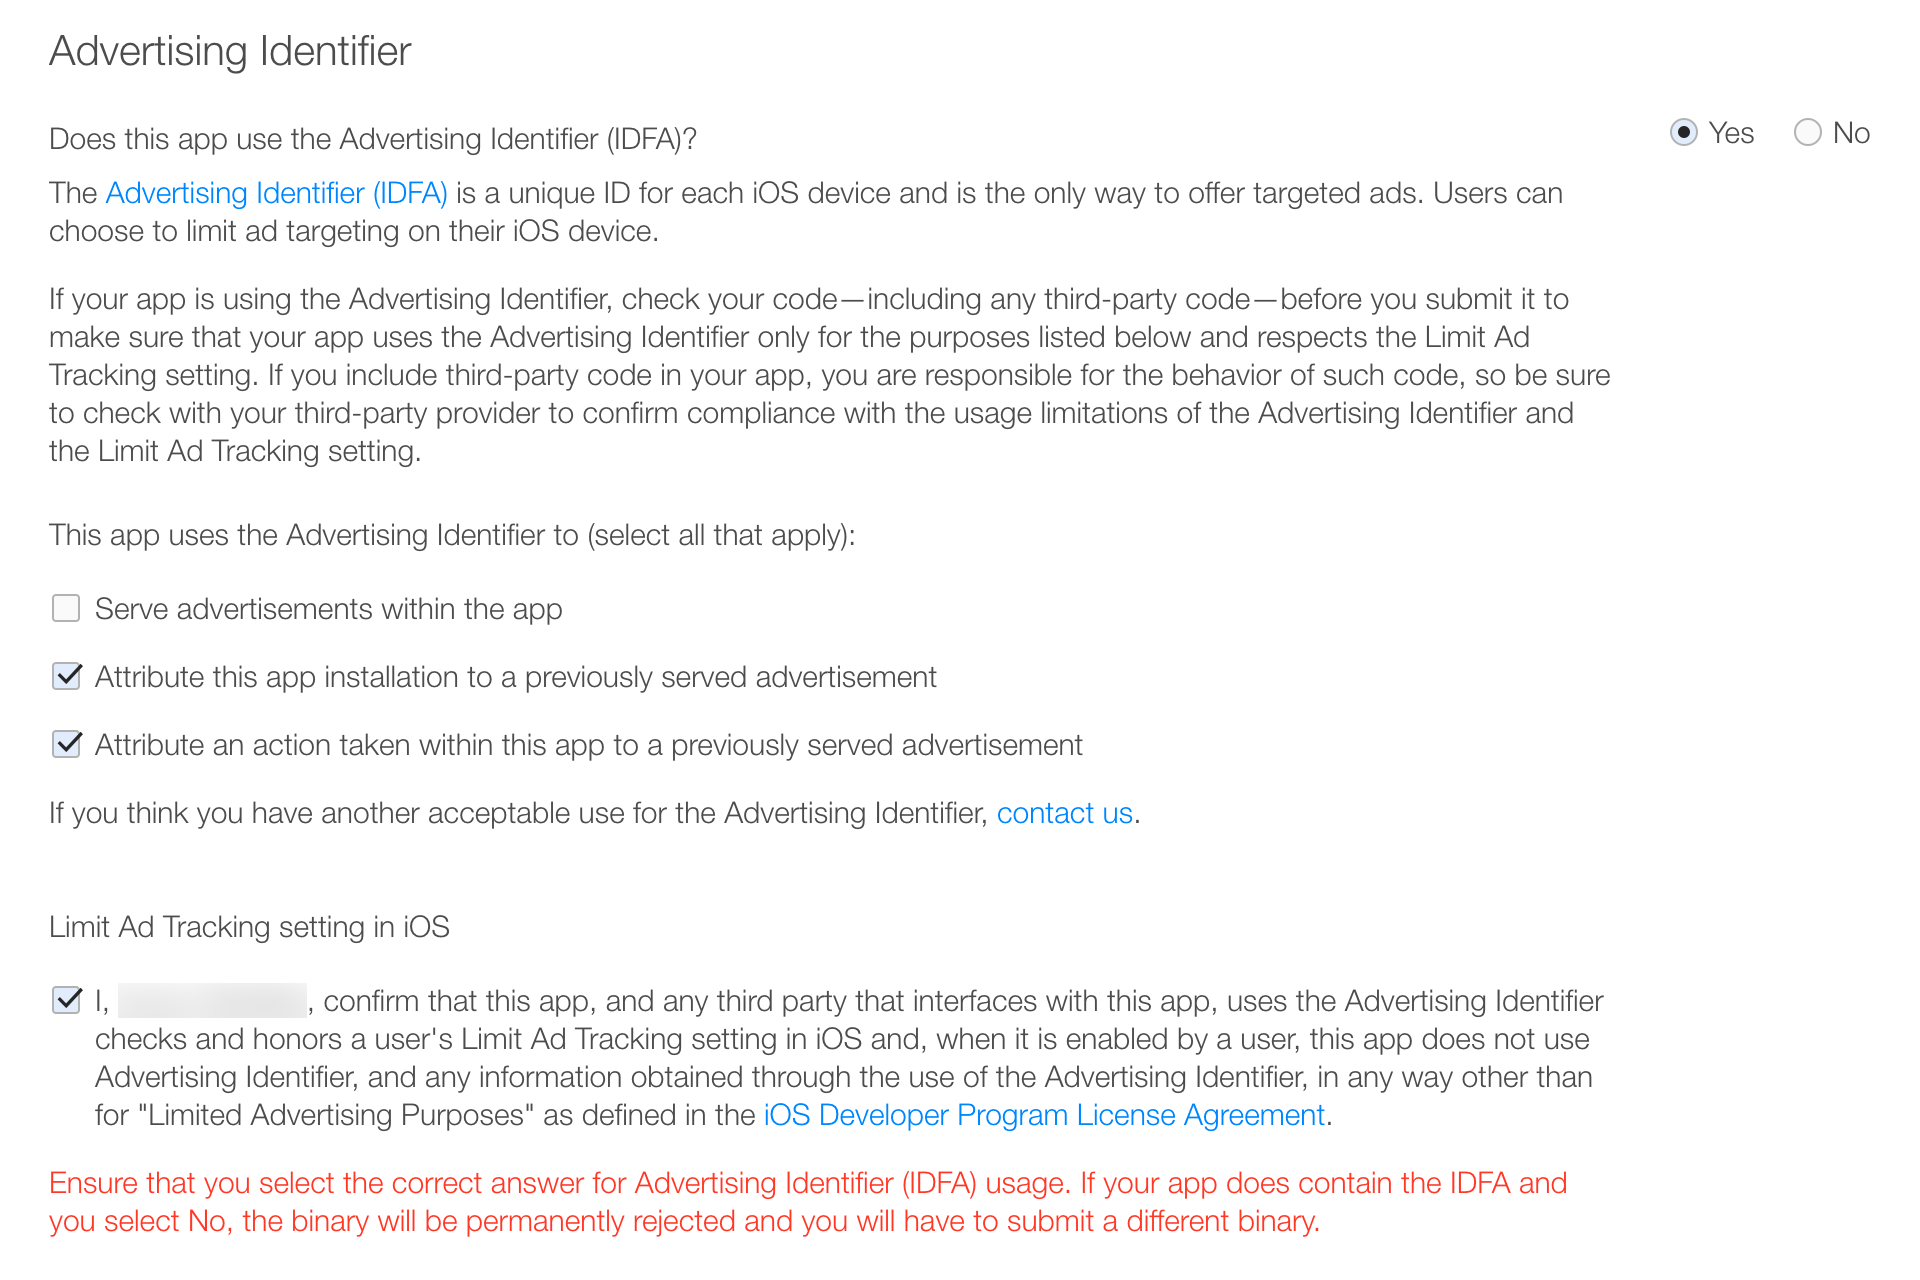
If you are using an advertisement system, you might need to check "Serve advertisements within the app" checkbox too.
Recording Events
Here is a quick summary on how to use event recording methods.
Regular Events
In examples given below, we will be recording a event named Xamarin studio with different scenarios:
Xamarin studio event occurred 1 times
Countly.SharedInstance().RecordEvent("Xamarin studio", 12);Xamarin studio event occurred 12 times
Countly.SharedInstance().RecordEvent("Xamarin studio", 12);Xamarin_ios event occured 12 times from country : India , App Version: 1.0 with total amount 20 and for duration .5 sec.
var dict = new NSDictionary("Country", "India", "App_Version", 1.0);
 Countly.SharedInstance().RecordEvent("Xamarin_ios", dict, 12, 20, .5);
Timed Events
In below examples, we will be recording a timed event called Tracking AppRating to track how long it takes to complete:
- Tracking AppRating started
Countly.SharedInstance().StartEvent("Tracking AppRating");- Tracking AppRating ended
Countly.SharedInstance().EndEvent("Tracking AppRating");Additionally, you can provide more information like segmentation, count and sum while ending an event.
var dict = new NSDictionary("Country", "India", "App_Version", 1.0);
 Countly.SharedInstance().EndEvent("Tracking AppRating" ,dict,1 ,345);
Duration of the event will be calculated automatically when endEvent method is called.
Push Notifications
Setting up Push Certificate
Please follow iOS, watchOS, tvOS & macOS documentation in order to set up APN credentials in Countly.
Configuring iOS app
Please enable Push Notifications and Remote notifications Background Mode in your app in Entitlement.plist and please make sure that you sign your application using an explicit Provisioning Profile specific to your app's bundleID.
Specify CLYPushNotifications in features array of CountlyConfig object. After that, you'll need to ask for user's permission for push notifications using AskForNotificationPermission() method of Countly, at any point in the app. You need to declare a class and inherit with UIResponder and IUIApplicationDelegate.
After that you need to add code given below in FinishedLaunching method. Countly iOS SDK will handle the rest automatically.
[Register("AppDelegate")]
public partial class AppDelegate : global::Xamarin.Forms.Platform.iOS.FormsApplicationDelegate
    {

        public override bool FinishedLaunching(UIApplication app, NSDictionary options)
        {
            global::Xamarin.Forms.Forms.Init();
            LoadApplication(new App());
            app.WeakDelegate = new MyDelegate();

            //Basic Setting for countly server
            CountlyConfig config = new CountlyConfig();
            config.AppKey = @"your_App_Key";
            config.Host = @"https://YOUR_COUNTLY_SERVER";
            config.Features = new NSObject[] { Constants.CLYPushNotifications };
            Countly.SharedInstance().AskForNotificationPermission();

            return base.FinishedLaunching(app, options);
        }
    }
Rich Push Notifications (iOS10+ only)
Rich push notifications lets you send image, video or audio attachments, as well as customized action buttons on iOS10+. You need to set up Notification Service Extension to use it. Add NotificationServiceExtension in your project and then navigate to NotificationService.cs file.
You also need to add Countly Analytics for Xamarin (iOS) Nuget package into your project.
And add the following line at the end of DidReceiveNotificationRequest() method as shown below:
using CountlySdk;Please enable Push Notifications in your notificationExtension Entitlement.plist. You need to create an app id and provisioning profile on Apple’s website for your Extension. You also need to configure App Transport Security setting in extension's Info.plist file. Otherwise, media attachments from non-https sources can not be loaded.
Please make sure that you have changed the Deployment Target version of extension target to 10, not 10.3. Otherwise users running iOS versions lower than Deployment Target value can not get rich push notifications.
public override void DidReceiveNotificationRequest(UNNotificationRequest request,
     Action contentHandler)
        {
            ContentHandler = contentHandler;
            BestAttemptContent =
      (UNMutableNotificationContent)request.Content.MutableCopy();

            CountlyNotificationService.DidReceiveNotificationRequest(request,               contentHandler);

        }
Deeplinking
Deeplinking consists of using a hyperlink that links to a specific piece of content within an app. You can redirect users to any custom page or view in your app, by specifying deeplinks as custom actions button URLs. For this, first, you need to create URL scheme in your project.
To do this, select info.plist -> Advanced -> Url Types.. Enter an identifier (ly.count.countly) into Identifier field. And enter your app's URL (countly) scheme into URL Schemes field.

Then, add the method to your Appdelegate.
In this method you can check the passed url for custom view navigation, using scheme and host properties. For example, if you set custom action button URLs as countly://productA and countly://productB, you can use something similar to this snippet:
public override bool OpenUrl(UIApplication app, NSUrl url, string sourceApp, NSObject annotation)
        {

            if (url.Scheme.Equals("countly"))
            {
                if (url.Host.Equals("productA"))
                {
                  // present view controller for Product A;
                }
                else if (url.Host.Equals("productB"))
                {
                  // present view controller for Product B;
                }
             }
            return true;
        }
When users tap on custom action buttons, Countly iOS SDK will open the specified URLs with your app's scheme. Following this, related method you added to your app's delegate will be called.
Advanced Setup
- Test Mode
For Development builds, your device will be marked as test device automatically. So, you can send push notifications to test devices by choosing Test Users radio button on Create Message screen of Countly Dashboard.
If you want to manually mark your device as a test device for Distribution builds like TestFlight or AdHoc, you can use IsTestDevice flag on CountlyConfig object.
config.IsTestDevice = true;- Disable Alerts Shown by Notification
For disabling automatically showing of messages by CLYPushNotifications feature, you can set doNotShowAlertForNotifications flag on CountlyConfig object. If set, no message will be displayed by using default system UI in the app, but push open event will be recorded automatically.
config.DoNotShowAlertForNotifications = true;- Send Push Token Always
Thanks to Remote Notification Background Mode of iOS, it is possible to send silent push notifications to users who have not given notification permission. But Countly iOS SDK does not send push tokens to server by default, from users who have not given permission for notifications. You can change this by setting sendPushTokenAlways flag of CountlyConfig object. If set, push tokens from all users regardless of their notification permission status will be sent to Countly server and these users will be listed as possible recipients on Create Message screen of Countly Dashboard. As these users are not able to be notified by alert, sound or badge, be advised this is useful only for sending data via silent notifications.
config.SendPushTokenAlways = true;- Notification Permission with Preferred Types and Callback
As asking for user's permission for push notifications differ by iOS versions, Countly iOS SDK has a one-liner convenience method askForNotificationPermission for both iOS10 and older versions. It simply asks for user's permission for all available notification types. But if you need to specify which notification types your app will use (alert, badge, sound) or if you need a callback to see user's response to permission dialog you can use AskForNotificationPermissionWithOptions() method.
UNAuthorizationOptions authorizationOptions = UNAuthorizationOptions.Alert | UNAuthorizationOptions.Badge | UNAuthorizationOptions.Sound;
            Countly.SharedInstance().AskForNotificationPermissionWithOptions(authorizationOptions, (arg1, arg2) => Console.WriteLine(arg1));
- Provide Geolocation [Enterprise Edition only]
By default, Countly server uses geoip database to acquire location of a user. But in case your app uses Core Location services, you can provide better accuracy location to Countly iOS SDK by calling RecordLocation() method with coordinates acquired from Core Location. Please do not call this method on each location update, because this will result in too many requests sent to Countly server. Once or twice per app launch is enough.
Countly.SharedInstance().RecordLocation(new CLLocationCoordinate2D(28.5986, 77.3339));
Note that this feature is available to set location information for push notification - it doesn't update user's city in User Profiles.
Crash Reporting
For using Countly CrashReporting, you'll need to specify CLYCrashReporting in features array on CountlyConfig object before starting Countly.
config.Features = new NSObject[] { Constants.CLYCrashReporting };With this feature, Countly iOS SDK will generate a crash report if your application crashes due to an exception, and send it to Countly Server for further inspection. If a crash report can not be delivered to server (e.g. no internet connection, unavailable server), then Countly iOS SDK stores the crash report locally in order to try again later.
For iOS, a crash report includes following information in addition to Countly Analytics already provides:
- Exception Name
- Exception Description
- Stack Trace
- Used RAM
- Total RAM
- Used Disk
- Total Disk
- Battery Level
- Device Orientation
- Connection Type
- OpenGL ES Version
- Jailbrake State
- Background State
- Time Since Launch
- App Build Number
- App BuildUUID
- Custom Logs generated by
crashLog:method (if any)
You can use crashLog: method to get custom logs with the crash reports.
Countly.SharedInstance().CrashLog("CrashLog");If you want to use custom crash segmentation you can set optional CrashSegmentation on ConfigObject:
config.CrashSegmentation = new NSDictionary("Key","value");You can records handled exception manually, besides automatically reported unhandled exceptions and crashes.
User Profiles
This feature is available with Countly Enterprise subscription.
You can see detailed user information under User Profiles section of Countly Dashboard by recording user details. You can record default and custom properties of user details like this:
//default properties

Countly.User.Name = "John Doe";
Countly.User.Username = "john";
Countly.User.Email = "johndoe@apple.com";
Countly.User.BirthYear = "1974";
Countly.User.Organization = "United States";
Countly.User.Gender = "F";
Countly.User.Phone = "+0123456789";

//save
Countly.User.Save();
In addition, you can use custom user details modifiers like this:
Countly.User.Set("key101","value101");
Countly.User.IncrementBy("key102",5);
Countly.User.Multiply("key102",2);
Countly.User.Max("key102",30);
Countly.User.Min("key102",20);
Countly.User.Push("key103","a");
Countly.User.PushUnique("key104","uniqueValue");

//save
Countly.User.Save();
View Tracking
For using Countly AutoViewTracking, you'll need to specify CLYAutoViewTracking in features array on CountlyConfig object before starting Countly:
config.Features = new NSObject[] { Constants.CLYAutoViewTracking };After this point Countly iOS SDK will automatically track appeared and disappeared views.
In addition to these default exceptions, you can manually add your own exception view controllers using AddExceptionForAutoViewTracking: method by passing view controller class name or title:
Countly.SharedInstance().AddExceptionForAutoViewTracking("MyViewControllerTitle");You can enable or disable AutoViewTracking using IsAutoViewTrackingEnabled property.
Countly.SharedInstance().IsAutoViewTrackingEnabled = true;If AutoViewTracking feature is not enabled on start configuration, enabling or disabling this property later has no effect.
In addition to AutoViewTracking, you can manually report appearance of a view using ReportView() method with views name:
Countly.SharedInstance().ReportView("my View");When you report another view, duration of previous view will be calculated and view tracking event will be recorded automatically.